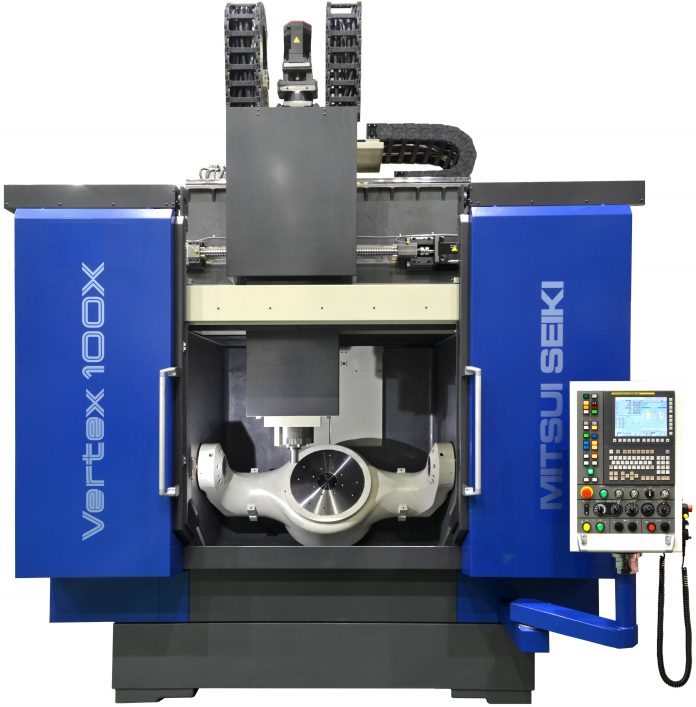
Mitsui Seiki’s new Vertex 100 5-axis vertical machining center will be in action in booth 338519 (McCormick Place South Building) at IMTS 2018. It’s engineered to fulfill manufacturers’ demands for a compact, high-speed machine capable of high-precision milling of larger parts such as blisks for aircraft engines. The Vertex 100 can machine workpieces 1,250 mm in diameter and 850 mm tall while occupying only 3 m x 4.2 m of shop floor space. X-Y-Z axis strokes are 1000 mm, 900 mm, and 750 mm respectively. Maximum swing diameter is 1480 mm.
From CAT 40 to HSK-A100 taper sizes the Vertex 100 is supplied with multiple spindle options (15,000 rpm, 25,000 rpm and 30,000 rpm). A large 60-tool standard automatic tool changer handles maximum tool lengths of 300 mm and maximum tool diameters of 125 mm (CAT40/HSK A 63) or 160 mm (CAT 50/ HSK A 100), offering maximum flexibility for job shop applications. Larger capacity tool changers are an additional option.
The machine’s tilt/rotary table, designed and built by Mitsui Seiki and supported by the rigid and robust cast iron base, provides high precision and rotation speed up to 100 rpm. The table’s C-axis motors are direct drive while the A-axis has tandem direct drive motors. The machine is capable of workpieces up to 1250 mm (49.25”) diameter.
The X- and Z-axes of the Vertex 100 are driven by single ball screws, with dual ball screws on the Y-axis. The linear axes are capable of fast, 1-G acceleration and deceleration. The machine’s Fanuc control features a state-of-the-art 375 mm (14.75”) LCD HMI.
In addition to providing a large work envelope relative to the machine footprint, the Vertex 100 has numerous features that assure accuracy and consistency. The machine features a proprietary cast iron bed and a solid “box-in-box” design that provide superior rigidity, stiffness and agility. The innovative machine geometry results in positioning accuracy in the X, Y, and Z-axes of 0.001 mm (0.000040”), ±6 arc seconds in A-axis, and ±4 arc seconds in the C-axis.
Hand-scraped guideways maximize precision. An advanced thermal compensation system assures size consistency, and glass scales provide minimum resolution of 0.001 mm.
Visit us in Booth 338519 at IMTS!

