


The list of items needing regular maintenance in your shop is likely long. It probably seems there is always something to be done. Unfortunately, while most shops are great at inspecting items like cranes, forklifts, and air compressors, an item that tends to slip through the cracks is the plasma cutting system.
It might be the old adage “the squeaky wheel gets the grease” proves true here. Plasma systems, at least good quality systems, don’t tend to be troublesome. The systems go about the job day in and day out slicing through whatever metal is thrown at it; but even though your plasma system may appear to work just fine, failing to properly maintain it is quietly impacting performance and life. Mechanical parts will start to wear causing rough machine motion. Part tolerances will deviate. Cut quality, particularly at higher speeds, will suffer.
It’s kind of like the tires on your car. To get the best life and performance, you need to make sure your tires have the right amount of air and are rotated regularly. If you don’t do those two things, will your car still roll? Sure. Will the ride and gas mileage suffer? Will your tires last as long? No. Are you more apt to get a flat tire at the worst possible time? Yes. It’s the same thing with your plasma system. If you don’t take good care of it, it’s going to break down when you need it most. Like when you’re in the middle of the largest plate cutting job you’ve ever had for your most lucrative customer. Not only have you just let down an important customer, at up to $200 per hour fully burdened, you’ve just cost your shop a lot of money.
The other problem, when components in the machine fail, troubleshooting and servicing can take days. This brings us to another old adage, “a pound of prevention is worth a pound of cure.” Fortunately, it doesn’t take much to keep a plasma system up and running. A small investment of your time is often all it takes to keep your system in good shape. The key though is to establish a regular preventive maintenance routine.
 Cleaning and inspection

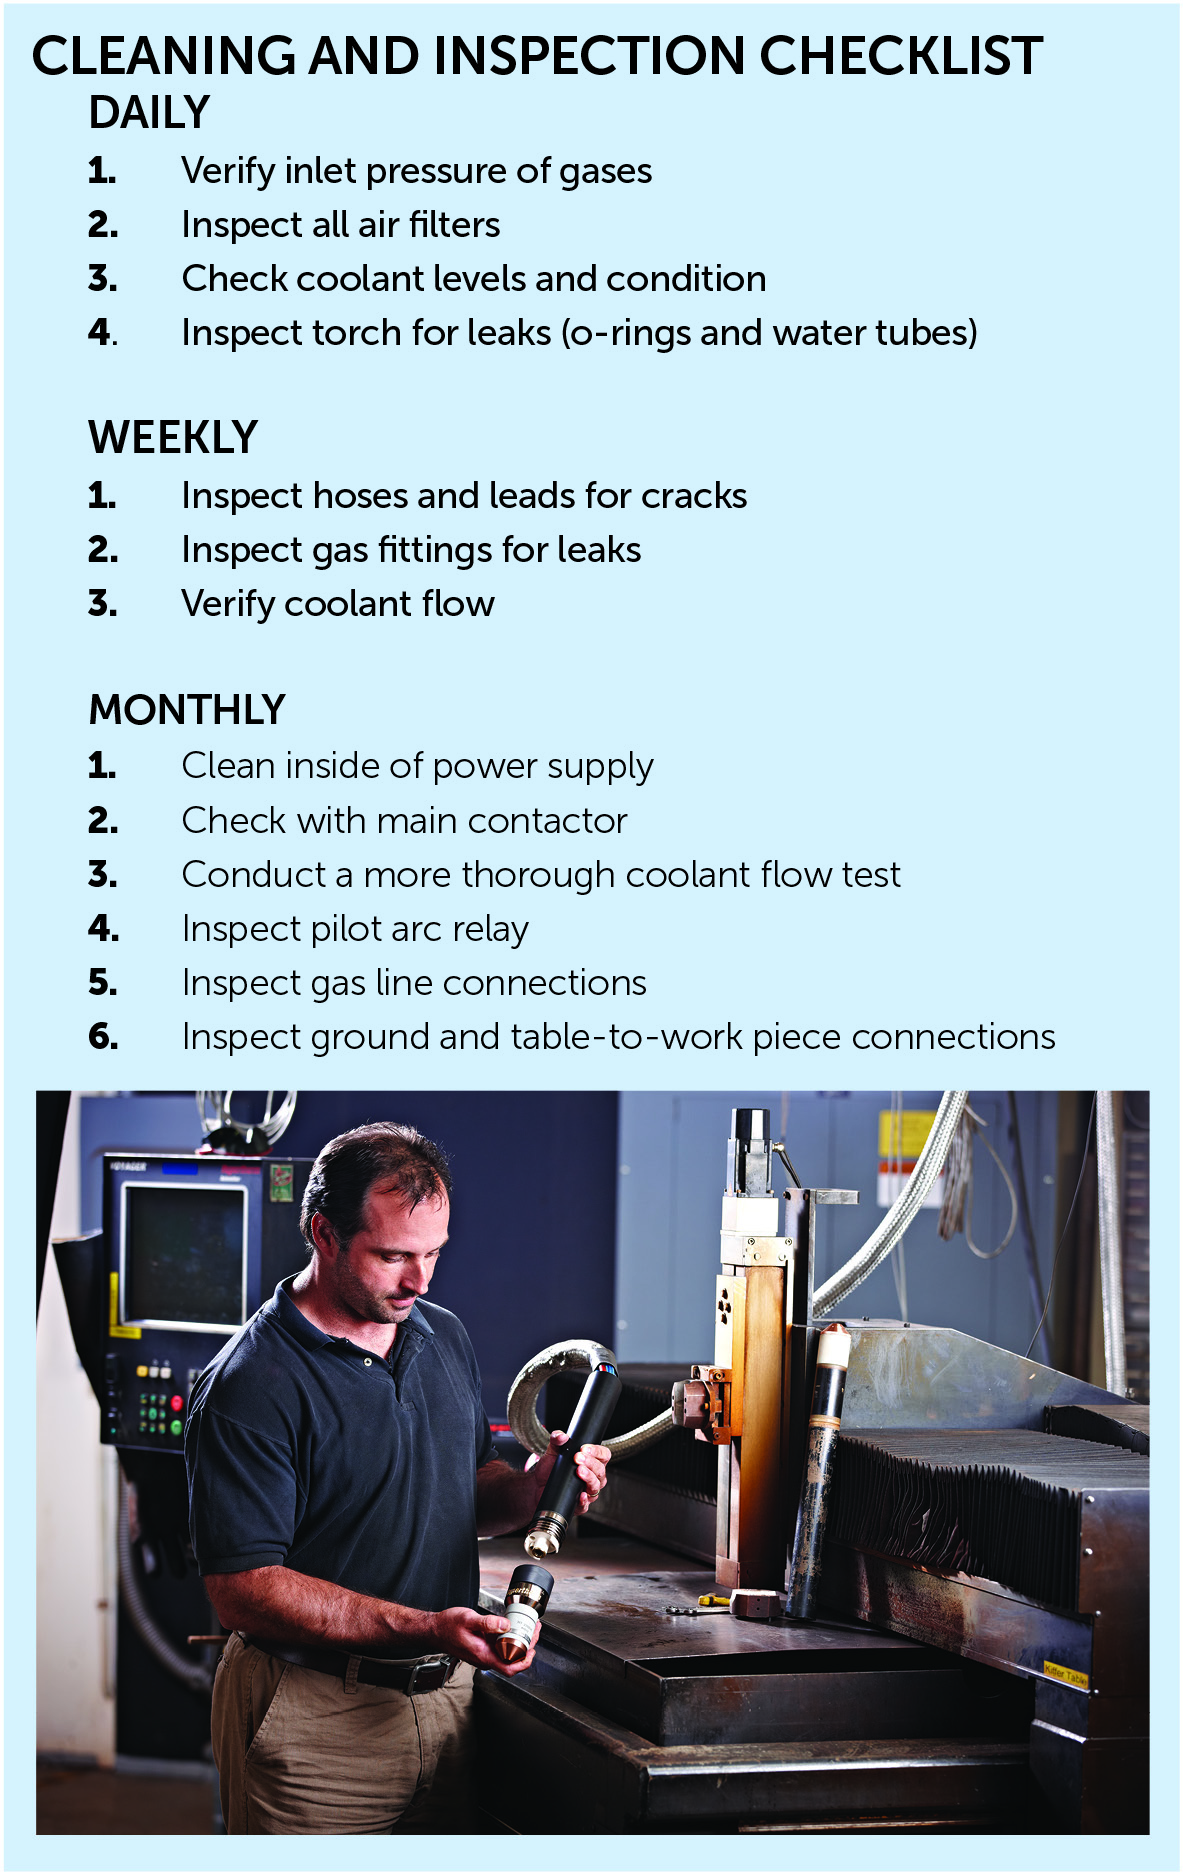
Your routine should contain two components: (1) routine cleaning and inspection, and (2) replacement of common wear items. Part one of your program can be divided into daily, weekly, and monthly tasks. Let’s start with daily tasks. There are four things you’ll want to do every single day your system is turned on.
First, verify inlet pressure of gases in both the “test pre-flow” and “cutflow” modes by making sure your regulator dial reaches the recommended PSI.
Second, inspect the air filters. You’re checking for moisture, oil, and particulates. If you see moisture, oil, or a lot of metal dust for example, you’ll need a new filter. If you only see a little dust or dirt, try to lightly vacuum it off. All air filters need eventual replacement, but if you’re going through more than your fair share then you likely have an issue with the quality of your air and should check its purity.
Step three is to check your coolant level and condition. If the level is below the neck of the tank, add more. If the coolant looks dirty, flush out your tank and refill it with fresh coolant.
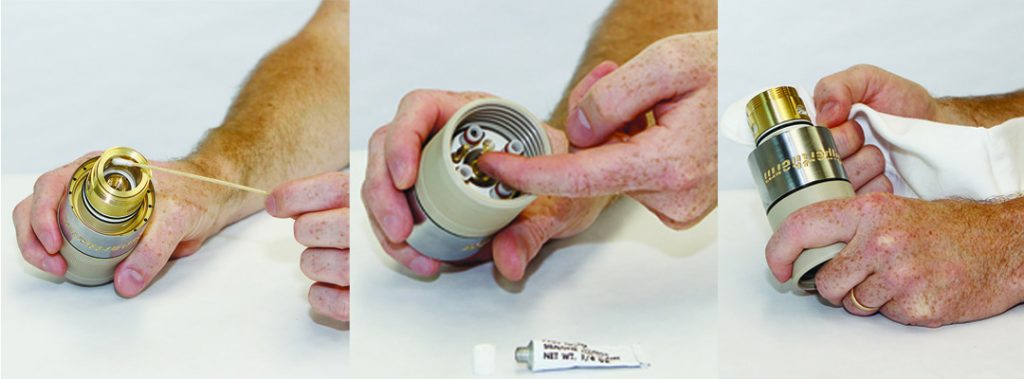
The final daily task it to inspect your torch. Hypertherm strongly recommends taking your torch into an office or other clean place to do this. Also, wash your hands. Typically, the two items requiring careful inspection are the o-ring and coolant tube. Remove the o-rings from the torch and check for damage. If all looks good, apply a very small amount of lubricant to your finger tips and lightly rub this lubricant onto the o-ring. The o-ring should look shiny but you should not see any lubricant. If you do, you’ve applied too much and should wipe some off.
Replace all o-rings so they fit snugly, then inspect all threaded consumables and remove any dirt that you see. You’ll also want to inspect the water tube to make sure it isn’t out of round, bent, or pitted. Inspect the nozzle and electrode mating surface for damage, then take a clean cloth and wipe off the torch, both inside and outside. Use a cotton swab if needed to clean hard to reach areas.
 Weekly Tasks
Next up are the weekly tasks. First step, inspect all air hoses, coolant hoses, and torch leads. Look for scrapes and cuts, punctures, chemical spills and burns, or any kinks or bends that would restrict flow.
Second, check for gas leaks by conducting the built-in leak and flow tests. Before doing this last test, make sure you are using the right consumables and have selected the correct plasma process for the test.
Finally, check your coolant flow. If you have an auto-gas console, this can be done right from your CNC. If you have a manual gas console, go to your console to read the flow rate. If the CNC detects a problem, then you’ll need to perform the specific Coolant Flow tests found in your owner’s manual.
Monthly Maintenance
Monthly tasks include cleaning the inside of your power supply, inspecting electrical components, and checking your ground and table-to-work piece connections. First, turn off the power to your power supply, then remove the top and side panels. You’ll likely see a lot of metal dust and other particulates that you’ll want to either blow out or vacuum. Don’t forget to vacuum build-up on the fan and fins. Next, gently remove dust and particulates from your circuit boards, taking extra care not to damage them.
The next step, with your power still off, is to check the main contactor for excessive pitting, or a blackened or rough surface. If you see any of these things, replace your contactor
Though you should check your coolant flow once a week, you’ll want to conduct a more thorough test each month. Typically, this more comprehensive test should be conducted by a trained service technician or other specially trained resource. At the same time, you’ll want to inspect all connection points—for example where the hose connects to the ignition console, the torch body, and the power supply.
The fourth task you should do once each month is inspect the pilot arc relay. Remove the cover, and inspect the contacts for excessive pitting. Again, if you see a lot of pitting, you’ll want to replace the relay.
Next, inspect your gas line connections by spraying them with soapy water. If bubbles appear on a gas line, tighten or replace it as necessary.
Lastly, inspect your ground and work lead connections. Verify that all system components are individually grounded to a driven earth ground and that your work lead connection—particularly the connection at your cutting table—is clean and tight. There should be no paint or oil directly on the connection as you need a clean metal-to-metal contact.
Replacement of common wear items
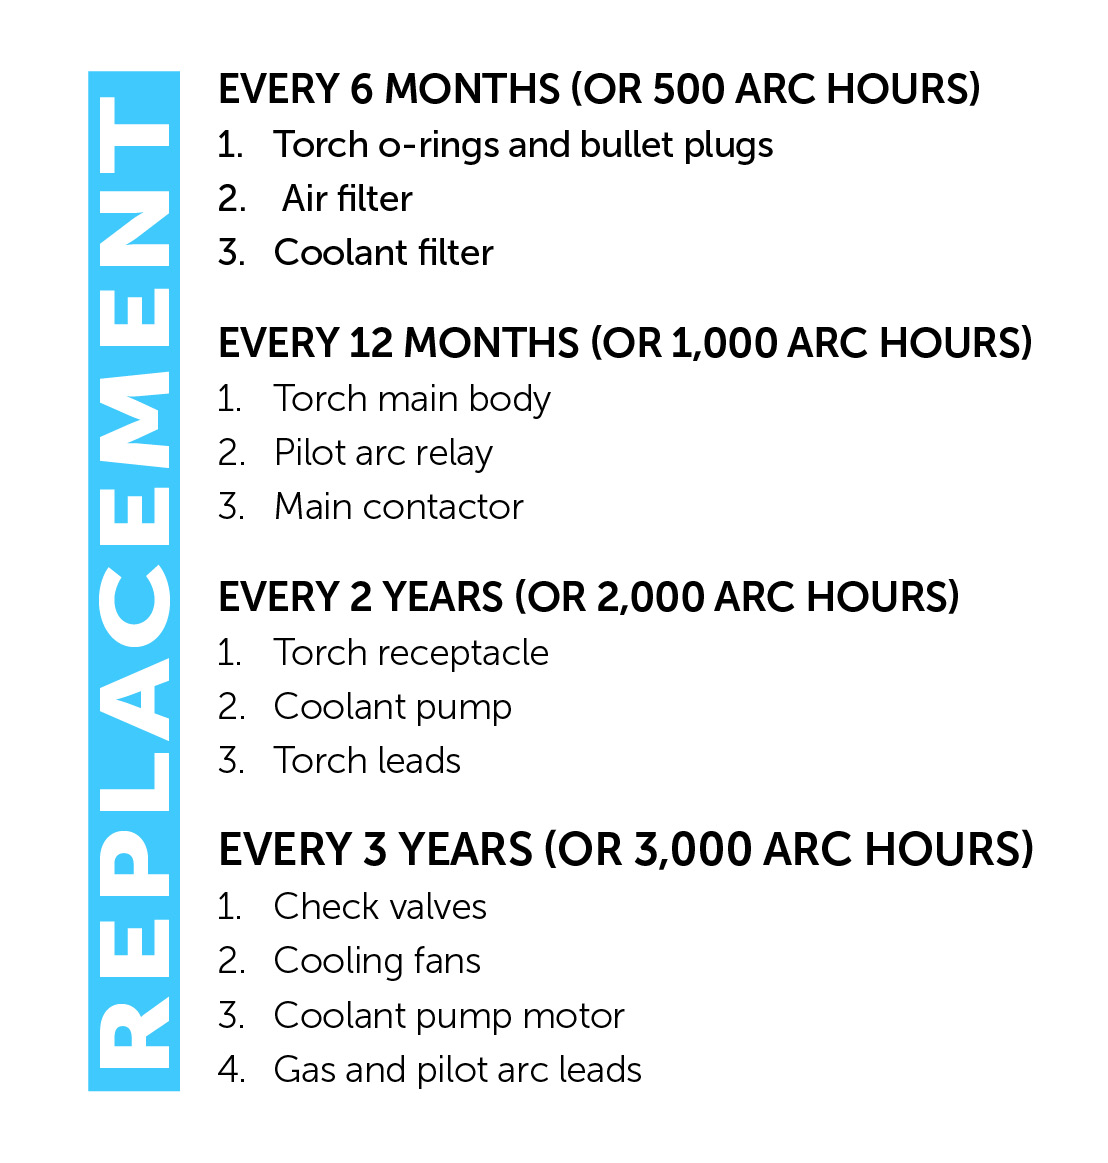
With your routine maintenance out of the way, you’ll now want to focus on common wear items. Because plasma systems are precision machines with moving parts like torches, main contactors, relays, and such, these parts are going to wear out. The frequency of part replacement will vary depending on system usage, but typically you’ll want to replace items after a set number of months or arc hours. Recommendations are as follows:
 In order to make part replacement easy, some manufacturers have put together comprehensive preventive maintenance programs, along with annual replacement kits. Companies such as c have taken it a step further by providing this information with every system we sell and establishing a dedicated landing page www.hypertherm.com/preventivemaintenance that offers customers the ability to download a complete maintenance program from their system.
Like your forklift, crane and air compressor, your cutting system requires care to operate at peak efficiency. Regular, ongoing maintenance is the smartest and most efficient way to optimize output, reduce unplanned downtime and minimize the operating costs of your cutting system. It’s an active approach as opposed to a costly reactive approach. This way, you’ll not only extend the life of consumables, but also, the life of your entire cutting machine.


